Automatic Meter Reading
Back in January, I — an adult with money that I can spend on frivolous things — purchased an RTL-SDR Blog V4* (including some antennas and mounts) for the grand sum of $49.95, because I heard you could do some cool things with it. After playing with it, getting distracted, working on other things, and finally returning to the task at hand, this is the first such fun project I’ve done that is worth sharing.
Background
For some quick context, radios (more accurately, radio receivers), like the kind you used to listen to music with before streaming existed, traditionally had analog hardware that was used to tune to the station you wanted and process the signal into something that sounded good. If you are so inclined, you can even make a rudimentary receiver out of a toilet paper tube, a block of wood, some wire, and a few other simple items. A software-defined radio, on the other hand, takes many of those analog components and performs their functions via software instead. They still need antennas, but once those radio waves have been captured, all of the signal processing is done digitally. An RTL-SDR is a particularly low-cost type of SDR based on a chip that was originally designed as a television tuner.
However, radios aren’t limited to AM/FM stations or broadcast TV. There’s a whole wide spectrum out there, filled with transmissions from things such as
- ADS-B: aircraft positions
- ACARS: “text messaging for airplanes”
- ATC: aircraft and control tower communications
- AIS: marine traffic
- Ham radio: non-commercial broadcasts
- Public safety: police, fire, and EMS communications
- Weather satellites
- Weather balloons (radiosondes)
- Backyard weather stations
- Tire pressure monitoring systems
- Pagers, surprisingly still common in hospitals
- Cheap remotes, such as for ceiling fans
- Utility meters
In fact, many websites that offer flight or ship tracking, ATC or public safety recordings, etc. actually just use a network of SDRs to collect the data, sometimes offering incentives for people to contribute.
Enthusiasts have of course figured out how to decode these messages (when they’re not already just raw audio) and have released many open-source software tools to do just that. Although I live close to a major airport and navigable waterway, what really pushed me to buy my SDR, however, was the utility meters. You see, gone are the times when a worker had to physically come onto your property and read the dials. Nowadays, meters have little radio transmitters attached that can log and broadcast the readings such that they can be picked up by a nearby receiver. Such automated meter readers make life a lot easier for the utility company, but they also make it possible for people like me to keep track of my consumption in real-time, rather than waiting for the bill or trying to figure out some kind of convoluted camera-based approach.
Exploration
Among my utilities, my electric meter has two-way communication with the company over an encrypted network, so there’s no way to listen in on those messages, though I am able to download the data the next day, which is good enough. But my water and gas meters shout into the void every minute or so in case a utility employee happens to be driving by for the collection. Sizing my SDR’s antenna to a length of about 6.5” for a ~910 MHz signal, and using two scripts — rtl_tcp and rtlamr — I was able to see readings from many meters scrolling down my terminal. To figure out which were mine and not my neighbors’, I had to read the serial numbers off the transmitters. For gas, that’s easy enough to view on the side of my house, but the water meter is down in a pit under the sidewalk (and a tamper-resistant bolt*). Once I had the meter IDs, I could also cross-reference against the readings in my bills to verify I was receiving the right ones and to get their units and scales (ft³ & 10s of gallons).
Moving Day
That’s all fine and well for experimentation from my computer in the back bedroom but not a viable long-term setup. My fiber ONT is down in my basement utility closet, and for convenience so are my router and Home Assistant. My Raspberry Pi Zero was also down there, since it doesn’t have WiFi. It had previously run Pi-hole, diyHue, and an Alexa-enabled fan controller, but it wasn’t doing much at the moment. Unsurprisingly, while connected to the Pi down there, the SDR wasn’t able to pick up the water meter, given the amount of soil in the way. Trying to extend the antenna somewhere else seemed silly due to the signal losses that would entail, so instead I decided it’d be best to move the Pi up to the attic*. This would give it a clearer view of the water meter, while keeping my electronics out of the presentable parts of the house. Since its Ethernet dongle had gotten a bit toasted and the power outlet up there is questionable, I bought a Power over Ethernet hat for it (rather than a WiFi dongle), ran 50’ of Cat6 through the HVAC chase**, and added a PoE switch to the utility closet. Once everything was hooked back up, by running things manually on the Pi, I could see that both meters were again available.
Code It Up
It’s one thing to manually observe meter readings, but for them to be useful, there must be a way to automatically trigger the collection and recording of the data. This is where my Home Assistant comes back into the picture. There already exists an add-on called rtlamr2mqtt that runs rtl_tcp and rtlamr and exports the results via MQTT. The idea is great, but I didn’t think that it quite fit my needs. So instead I decided to write something similar, but simpler, of my own. The result is amr2mqtt*.
The amr2mqtt repo has all of the details, but the main idea is that in accordance with a config YAML file, the script will start up rtl_tcp, run rtlamr (and have it filter for specific meter IDs and message types), parse the JSON output, format/scale it, and send it off to the given MQTT broker. It can run continuously, or it can terminate after all of the sought-after meter IDs have been found or after a time limit. That’s it, just a couple hundred lines of Python, but exactly what I wanted. There’s also some guidance for using systemd so that it will run automatically, in either mode. For instance, I have it set up to run hourly. I did this for a couple reasons: I really don’t need the data every time the meters send it out; the resolutions of the meters are low enough that you don’t really get any more granular by running more frequently; the SDR actually uses a bit of power and can get pretty warm, so I don’t want it running all the time; and by leaving gaps between collections, that gives me time to try to listen to other things if I ever want to.
With the readings now being sent out over MQTT, it was straightforward to get Home Assistant to then record them simply by adding a section like this in its configuration file.
mqtt:
  sensor:
    - name: "Gas Meter"
      unique_id: "amr_gas_meter_12345678"
      state_topic: "amr/12345678"
      value_template: "{{ value_json.consumption }}"
      unit_of_measurement: "ft³"
      state_class: "total_increasing"
      device_class: "gas"
    - name: "Water Meter"
      unique_id: "amr_water_meter_87654321"
      state_topic: "amr/87654321"
      value_template: "{{ value_json.consumption }}"
      unit_of_measurement: "gal"
      state_class: "total_increasing"
      device_class: "water"
Results
The result of all this effort is that now I can view the data like below (with electric data coming from another integration*). The gas meter has a resolution of 2 cubic feet, and the water meter increments every 10 gallons. You can tell when the water heater fired to stay warm, and you can also see the impact from showering and doing laundry that afternoon.
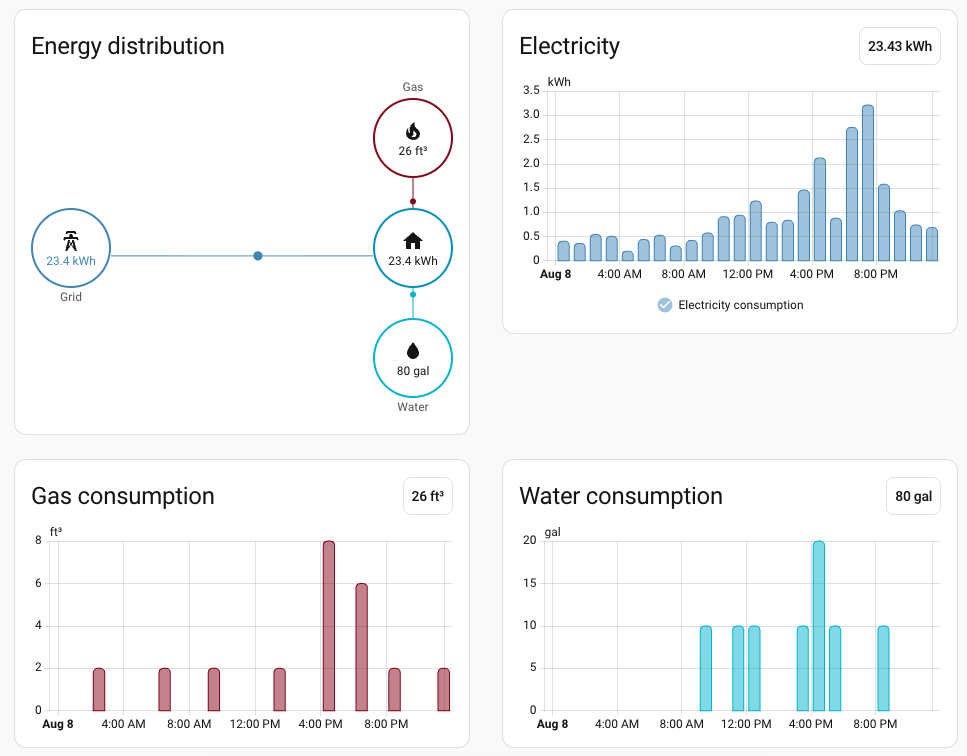
Now that the raw data is in Home Assistant, there are plenty of ways to build on top of it. Leak detection would be an obvious example (whether a simple toilet flap or something more catastrophic). Performing energy efficiency calculations might be another. If I record other meters as well, I could also compare my consumption to the neighbors (anonymously) or set up a way to message them their own consumption (with their permission).
Overall, you can get as elaborate as you want with this, and that’s part of the fun, especially since the investment was so small. Without getting a second SDR or some kind of antenna switch, I’ll be a little limited in the frequencies I can pick up to mostly just those around 910 MHz. Even so, there are enough interesting transmissions in that range that I anticipate adding additional capabilities to this little setup of mine in the future.